One of my biggest niggles when it comes to my makeup is the shadows I get under my eyes. I recently purchased Benefit's 'Perk Up Artist' - a small kit containing a corrector, concealer and brightener.
It's important to note that any products designed to cover dark shadows should not just be applied over the darkened area but also slightly below, extended towards the bridge of the nose and also above the eyelid to ensure the cream is properly blended with the foundation. Otherwise you risk just highlighting the problem.
The first thing I noticed about the creams is that they are very greasy and therefore do not apply in the way you would expect a typical concealer or foundation product to. This made is really difficult to use with the brush provided as I found it smeared around the area and so I decided a better technique would be to use my little finger to press the product into place.
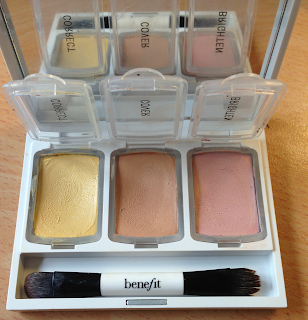

For those who aren't familiar with correctors - their purpose is to neutralise the blue/red undertones commonly found under the eye area and create something of a base for the concealer to sit on (effectively making it more effective). The corrector did seem to work quite well with my skin but the concealer was a bit too yellow for my tone and therefore I felt it was quite prominent on my face. Another thing I found was that as I mentioned before, the creams were really quite greasy and this made it hard to effectively layer them on top of each other as they seemed to just mix together despite me leaving 3-5 mins for each layer to settle.
Finally, I applied the brightener which is designed to reflect light from the undereye in order to make the area appear lighter.
I took the below picture to demonstrate the results of the Perk Up Artist kit (please ignore my devastatingly short eyelashes) which was used on the right eye as you look at the picture, with the left eye only being covered by foundation.
 |
| Just foundation Perk Up Artist used |
Although I can see a small difference, I think that is mainly due to the shine of the product, again caused by the greasiness and I wouldn't feel happy with this result for a night out as I tend to prefer my make up matte. Night clubs cause enough sweat without my makeup adding to the look!
Even an hour after applying this I felt like if I were to touch my under-eye I would remove the product which again isn't much use. Although you could apply powder on top this would defeat the purpose of the brightener, meaning you'd have to apply highlighter on top of the powder and before you know it you're carrying round three blocks of makeup just for your under eyes!
I did wonder whether my shadows were simply too much for the kit but I checked Benefit's Q+A section on this product and one of their make-up artists clearly states "Yes, Perk Up Artist is good for dark eye circles". Sadly, I disagree.
I definitely won't be buying this product again unfortunately, after paying £23 for it from Debenhams I'm quite disappointed with the results. I'm hoping to invest in the Bobbi Brown concealers in the next few weeks which I have used previously so I'll do a compare and contrast post for you to see the difference.
Let me know if any of you have had a good experience with any of the other Benefit products, I'm starting to lose faith!
 We all know that two-tone, or ombre, hair has been all the range over the last few months but I've also seen some pretty impressive images of two-tone lips so I decided to give it a go myself. There are some amazing outlandish examples, but as I was going out for dinner last night I decided I'd opt for something a little more subtle like the pink example to the left.

 I started with foundation covering my lips as this provides a good surface for the colour to stick to. I roughly outlined my lips using the thinnest brush and the dark Illamasqua lipstick and then used the brush to drag the colour into the middle (but not all the way). I then applied the lighter Mac shade into the remaining space and proceeded to blend the two together which gave quite a subtle look.


