Pages

Thursday 22 August 2013

Two-tone Lips

We all know that two-tone, or ombre, hair has been all the range over the last few months but I've also seen some pretty impressive images of two-tone lips so I decided to give it a go myself. There are some amazing outlandish examples, but as I was going out for dinner last night I decided I'd opt for something a little more subtle like the pink example to the left.


To achieve this, I used two lip brushes to apply the product (1), Mac Pro Longwear in 'Dress it up' (3), Illamasqua 'Welt' (2) and Mac Pro Longwear paint pot 'Chilled on Ice' (4).


I started with foundation covering my lips as this provides a good surface for the colour to stick to. I roughly outlined my lips using the thinnest brush and the dark Illamasqua lipstick and then used the brush to drag the colour into the middle (but not all the way). I then applied the lighter Mac shade into the remaining space and proceeded to blend the two together which gave quite a subtle look.

I think the next time I try this, I may use a third even lighter call as my end result was very subtle to the point where I'm not convinced the photo does it justice - I promise it was much better in person!

To finish the look I used my fingertip to add the 'Chilled on Ice' paint to my lips which gave it a gorgeous glittery sheen.


What do you think?


Wednesday 21 August 2013

Do you want mayo with that?

Whilst on one of my many wanders through the magical land that is Boots, I stumbled across a brand I had previously never heard of - ORS or Organic Root Simulator. As the name suggests they specialise in haircare and have an array of products designed to make your hair shinier and stronger.


I picked up their tub of Hair Mayonnaise which was £6 for around 500g. Normally I use Aussie hair care and just a sachet of their hair mask can cost £1 for one use so I was pretty happy with my bargain.

The wording on the tub promised to "mousturise and strengthen damaged, over-processed hair". Like most girls I tend to give my hair a tough time with the curlers and straighteners and bleaching so suffer from split ends quite a lot. Anything that can help to prevent this is worth a try in my book!

The treatment has a similar texture to cake mix and whilst I couldn't put a name on the smell it's really comforting and reminds me of being a small child for some reason!

To use it, I shampooed my hair with my normal product and then squeezed out any excess moisture before applying a large scoop from the tub and working it through my hair focusing on the ends (I would advise to avoid your roots as conditioner and the like can cause your hair to become greasier).

Now the label tells you to put a plastic cap on your head to let the product develop but unfortunately it does not come with one and I forgot to pick one up. Instead, I loosely wrapped my hair in a towel. You are then told to apply heat for 15-20 mins which activates the products key ingredients (olive oil, wheat germ and egg protein). I used my hair dryer on a low heat setting but must admit my arms grew tired after 10 minutes of wafting and so just chilled in my towel for the last 5.

When I got back in the shower to rinse it off, I admit my hair felt really weird at first but as the product came away I could feel it growing silky soft in my hands and it still smelt delicious!

After all this nourishment, I probably should have towel dried as advised by the tub but I am a slave to a cheeky blow dry! My hair felt amazing and I could definitely notice a shine to it that isn't normally achieved with my everyday shampoo and conditioner.

The only thing that lets this product down in my eyes is my own laziness - having to get out of the shower to heat activate it and then get back in is a bit of a chore and we all know the worst part of a shower is turning off the hot water and stepping out into the cold! I'm not sure whether the steam generated from the shower is enough to activate the ingredients but I may well give it a try.

Apart from that, I think the hair mayo is amazing and I would definitely recommend. ORF do a few other hair treatments such as carrot oil and hair fertilizer that I'll be trying in the future, all of which are available from Boots.

Tuesday 20 August 2013

Nails Get Mouthy

I received a promotional email from Nails Inc today detailing the new 'Monogram Manicure' they are bringing out in September...

Although it is quite a kitsch idea I'm not sure I can see it catching on at £20 per set. And besides is this really new? With the wealth of material out there on the internet for inspiration I'm not convinced that just sticking some Times New Roman letters on will be a massive hit.

My younger sister has become really attached to printing off pictures or words from the computer, just onto plain A4 paper, and transferring these to her nails which seems like a much more imaginative route to go down.

What do you guys think - will we soon be able to tell somebody's name from their nails?

For anyone who is interested in pre-ordering their set they are available from Nails Inc website.

Monday 19 August 2013

Time for a Perk Up?


One of my biggest niggles when it comes to my makeup is the shadows I get under my eyes. I recently purchased Benefit's 'Perk Up Artist' - a small kit containing a corrector, concealer and brightener. 


It's important to note that any products designed to cover dark shadows should not just be applied over the darkened area but also slightly below, extended towards the bridge of the nose and also above the eyelid to ensure the cream is properly blended with the foundation. Otherwise you risk just highlighting the problem.

The first thing I noticed about the creams is that they are very greasy and therefore do not apply in the way you would expect a typical concealer or foundation product to. This made is really difficult to use with the brush provided as I found it smeared around the area and so I decided a better technique would be to use my little finger to press the product into place. 


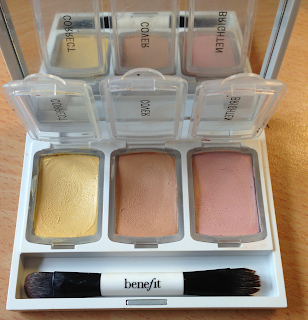
For those who aren't familiar with correctors - their purpose is to neutralise the blue/red undertones commonly found under the eye area and create something of a base for the concealer to sit on (effectively making it more effective). The corrector did seem to work quite well with my skin but the concealer was a bit too yellow for my tone and therefore I felt it was quite prominent on my face. Another thing I found was that as I mentioned before, the creams were really quite greasy and this made it hard to effectively layer them on top of each other as they seemed to just mix together despite me leaving 3-5 mins for each layer to settle. 

Finally, I applied the brightener which is designed to reflect light from the undereye in order to make the area appear lighter. 

I took the below picture to demonstrate the results of the Perk Up Artist kit (please ignore my devastatingly short eyelashes) which was used on the right eye as you look at the picture, with the left eye only being covered by foundation.

Just foundation                             Perk Up Artist used

 Although I can see a small difference, I think that is mainly due to the shine of the product, again caused by the greasiness and I wouldn't feel happy with this result for a night out as I tend to prefer my make up matte. Night clubs cause enough sweat without my makeup adding to the look!

Even an hour after applying this I felt like if I were to touch my under-eye I would remove the product which again isn't much use. Although you could apply powder on top this would defeat the purpose of the brightener, meaning you'd have to apply highlighter on top of the powder and before you know it you're carrying round three blocks of makeup just for your under eyes! 

I did wonder whether my shadows were simply too much for the kit but I checked Benefit's Q+A section on this product and one of their make-up artists clearly states "Yes, Perk Up Artist is good for dark eye circles". Sadly, I disagree.

I definitely won't be buying this product again unfortunately, after paying £23 for it from Debenhams I'm quite disappointed with the results. I'm hoping to invest in the Bobbi Brown concealers in the next few weeks which I have used previously so I'll do a compare and contrast post for you to see the difference.

Let me know if any of you have had a good experience with any of the other Benefit products, I'm starting to lose faith!

Saturday 17 August 2013

Luxury Vs. Affordable; The Science of Skincare

I admit - In the past I have been something of a skin care snob using mainly Chanel and Laura Mercier but when I visited my boyfriend and disastrously forgot to pack my moisturiser I found myself "making do" with Boot's own No 7 but was pleasantly surprised. I purchased the Beautiful Skin day cream for dry/very dry skin and found that it was really thick and my face felt heavenly after using it. If I miss moisturising for just 2 days I develop really noticeable dry patches across my cheeks and foreheads and so have always favoured the "premium" brands as I found their formulas to be rich and really hydrating but No 7 got me thinking about whether the cheaper products are just as good as the luxury. 

I like to think I can tell the difference in paying for a Dior foundation over a Maybelline in terms of texture, ease of application, lastability etc a lot of which is to do with how the ingredients (quantity and quality) are combined. Skincare is more of a science particularly when it comes to products that are meant to reduce fine lines and reverse the signs of ageing. So do the ingredients really differ? Is a premium product worth the premium price? 

Unlike poor student me, my mum invests in the Creme de la Mer moisturisers so I decided to have a look into the differences between her cream and mine. 

50ml of the No 7 Beautiful Skin costs £12.50 compared to Creme de la Mer's Ultrarich Creme which would be £175.00 for the same amount- a difference of 740%. 


The basic ingredients of La Mer as per the pot are a variety of emollients (creates a protective film over the face), humectors (pull water from within your body through into the epidermisor the outer layers of skin where dehydration visibly shows) and occlusives which slow the evaporation of water from the skin - this is the greasiness you sometimes feel in moisturisers. These are all basic things that can be found in all moisturisers. What makes Creme de la Mer special is their "miracle broth" which is infamously hard to recreate. The more unusual ingredients (in that they are not commonly found in other moisturisers) are as follows:
  • Algae extract - normalise skins moisture levels
  • Lime extract - antibacterial 
  • Eucalyptus leaf oil - healing properties
  • Magnesium sulphate - antioxidant
  • Sesame seeds - antioxidant
  • Alfalfa seeds - water retention and skin tightening
  • Sunflower seeds - anti ageing properties
  • Powdered almonds - fatty acids which are moisturising oils 
  • Vitamin E succinate - anti ageing properties
  • Vitamin B3- strengthens skins barriers
  • Vitamin B12 - hydrating 
  • Beta-carotene - anti ageing properties
As you can see from the list there's lots of added hydrating and antiquing benefits that come from Creme de la mer and I wasn't sure how No 7 would stack up against it. 


After researching the ingredients listed on the pot, in addition to the expected as mentioned above, I discovered several additional ingredients with added moisture and anti ageing benefits such as Shea butter, vitamins C and E and rosehip seed oil whose effects are all well researched and documented.  Although the quality and quantity of the ingredients and therefore their benefits may differ between the two products the principles behind them appear to be very similar and there are countless good reports for the cheaper version with Gwynneth Paltrow apparently being a fan!  A further benefit of the No 7 cream is that it contains SPF to block out the suns harmful rays which is one of the main contributors to premature ageing and the reason for fine lines and wrinkles. The benefit of SPF cannot be underestimated. The Creme de la Mer does not contain any SPF or similar UV ray prevention ingredients. Personally I will be sticking to No 7 for a while I am that impressed with the quality of the creams, and from researching the ingredients of both I am confident that there is no major magical properties that my cream is missing. What do you think - is the £105 justified?


Thursday 15 August 2013

Let's talk basics


Foundation can absolutely make or break your look. It can cover all multitude of sins and is the best way to ensure bronzers and other products really last and look good on your skin.

When I was around 5 I started competing in dance tournaments around the UK and this was really my first introduction to makeup. My favourite part of every show or competition was always when my mum would sit me down and whip out her makeup bag to dab a bit of foundation onto my face and ply my lips with some shocking shade of red or hot pink. A couple of years after  starting secondary school was when I started noticing the pressure to “look good” and girls would start arriving to classes with a full face of make up on. I joined in but perhaps was thinking about the good old dancing days too much when it came to foundation. Like a lot of girls that age I was convinced my skin was an absolute monstrosity that must be covered by something more perfect and so the foundation would be piled on and not always the correct shade. After a few instances of this my mum finally threw out my pot of Rimmel Air Mousse (I think that’s what I started with anyway) and gave me a proper lesson in how to apply. Despite some initial protests that you could still see too much of my own skin, I fell in love with how my skin could suddenly brighten up and look more flawless whilst still looking like.. skin.

And so started my love affair with dewiness. Over the years I’ve tried quite a few foundations ranging from Rimmel to Bourjois to Chanel but my absolute favourite that I have come back to time and time again is Dior’s Forever.


Wednesday 14 August 2013

Makeup brushes deserve some TLC

When it comes to makeup, it doesn’t matter whether you use Armani or Asda’s own but if the tools you apply it with aren’t receiving regular TLC your makeup will suffer for it. One of the most important things you can do to keep your makeup (and skin) looking fresh and dewy is to regularly wash your brushes. Sounds simple, but when my friends caught me at the kitchen sink with a basin full of brushes they couldn’t understand what I was doing or why and I was shocked that they didn’t do this – believe me they got a lecture!

As girls we regularly suffer from spots (or congested pores as I like to call them) and the bacteria found within them can easily be spread to other areas of the face through the use of makeup brushes. Even if you are lucky enough to not get spots, there is a ton of bacteria living on our skin not to mention natural oils that our pores secrete and if makeup brushes aren’t washed this will all just build up and be spread across your face with each use of the brush.

On a less clinical note, just using makeup brushes for a week causes insane build up on the bristles (goodbye white brushes) and therefore it is harder to control the amount of product being applied to the skin.

Make up brushes can be really expensive and should be treated like an investment – if you want them to last you need to take care of them.

It sounds like an effort and my friends told me my OCD tendencies are getting slightly out of hand but giving them a good wash every 2 weeks really does make such a difference to your application and besides, brushes look much prettier without the discolouration!

To get the best results you need something somewhere in between a soap (anti-bacterial) and a shampoo (conditioning), although for synthetic brushes just a soap would be fine. Personally I use Trish McEvoy’s purpose-designed Brush Bath which is a bit pricey at £13 but has lasted me for around 8 months so far and there’s still plenty left. A lot of the big makeup brands have their own versions, I’ve heard good things about MACs, but really all you need is something anti-bacterial and unfragranced.

Make sure the water you use on your brushes isn’t any hotter than ‘warm’ or you will risk melting the glue holding the hairs in place. I tend to dampen the brush, swirl the bristles in a small amount of cleaning product and rinse, repeating until the water runs clear and no bubbles remain. The colour of the water after just one week of using your brushes, particularly foundation/bronzer, should shock you into a regular routine!


Brushes are best left to air dry naturally, so after giving them a quick squeeze to remove excess water leave the heads hanging over the edge of a surface or stood upright in a pot so that they can reform their normal shape and in 2-6 hours (depending on the size) they should be dry and good to go.

I promise you will see such a difference in your makeup!

Percy